To learn how to administer these tests within the Classic version of ESGI, click here.
Overview
Discover a variety of efficient methods for administering tests smoothly. We offer a selection of customizable options designed to suit your unique testing needs, including:
Yes/No Test
Choose between New Session or Resume
Single Score Test
Rubric Test
Student Self-Assess Test
Administering a Yes/No Test
- Click on the student's name in your class list, then click "Test".
- Continue through all test questions, selecting Yes, No, or Skip until you complete all the test questions. You must go through all the test questions with a Yes, No, or Skip to record a complete test session.
- You can include a note with each answer response. The note will be displayed on the Parent Letter Report.
- The final test results will be displayed immediately after the last question is answered.
- The score is reflected in the pie chart along with student Class information and the option to add a summary note.
- You can choose to print Flash Cards or select Done when finished.
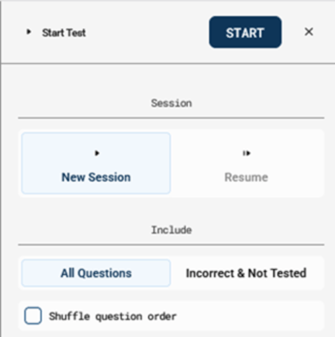
Choose between New Session or Resume: (Only available with Yes/No Test)
Please Note: If you close a previous test session before all questions have been marked as correct, incorrect, or skipped (by selecting the “X” in the top right corner), you will have the option to resume the test later. If you choose to resume, you will continue from where you left off. Upon completing the test, the results will be recorded as a single test session with the most recent test date.
- After testing a student for the first time, you will have the option to start a New Test Session or Resume (Image 1).
- When starting a New test Session, you can select “All Test Questions” or “Incorrect & Not Tested”. The final test results will be displayed immediately after the last question is answered. The score is reflected in the pie chart along with student Class information and the option to add a summary note.
- If you choose "Resume," the test will continue from the point where you left off. If you resume the test on a different day, the completion date will show the day you finish it. If you need to change the test date, please refer to our Edit and Modify Test Support Page.
Image 1
Administering a Single Score Test
- Click on the student's name in your class list, then click "Test".
- Read over the Introduction Page with instructions on how to test the student.
- Read the question to the student and enter the test score in the box (or use the up/down arrows). Observational notes can be added in the Notes field.
- Click SAVE.
- The results are displayed immediately after you have entered a score.
- The score is reflected in the pie chart along with student Class information and the option to add a summary note. Please note: Flashcards are not an option for Single Score Tests.
Administering a Rubric Test
- Click on the student's name in your class list, select your Rubric test, then click "Test”.
- Click in the description box for the level the student achieved for each set of criteria. The score will automatically be added and totaled.
- Select submit when the test is completed.
- Results are displayed in a chart format. To view full results, select “Show Criteria” to display the chart for each question. Please note: Flashcards are not an option for Rubric Tests.
- The Export Rubric button will export the Test Session Details in a PDF.
- When completed, click Done.
Administering a Self-Assess Test
ESGI's Self-Assess tests empower students to complete assessments on their own devices, fostering independence in their learning. These tests are designed in a multiple-choice format and include audio options for both questions and answers, enhancing the test-taking experience.
The Self-Assess testing option allows teachers to introduce students to using a computer or tablet. Teachers set up the test on a device for the student to take a multiple-choice test. Audio is available for questions and answer choices, so students can navigate independently.
Helpful Hints:
- Determine whether a student(s) would benefit from Student Self-Assess testing. If not, disabled it in your account settings. To disable the setting, select the gear icon (system settings). In system settings, expand the screen by selecting the small expand arrow at the top of the page. Click Student Testing Options and uncheck the box in the Self-assessment Administration section of the page.
- If you use an iPad, please be sure it is in the horizontal/landscape position.
- A practice test is available and can be taken as many times as needed.
- Supervise the first few self-assess test sessions until the student is comfortable.
- Click the audio button for any question or answer choice for a read-aloud option.
- Teachers can log into their account on multiple devices to configure the self-assess tests for each student if not using the Assignment Center.
Getting Started
Self-assessment tests can be found and added to a subject tab by completing the following:
- In Test Explorer, click "Self-Assess" under Administration. Scroll and search for Self-Assess Tests. Select the check box next to a test (multiple tests can be selected). When one test is selected, the “Add Selected” bar will appear at the bottom of the screen. Once you have selected your desired tests, select “Add Selected”. In the “Add Test” window, you can add the test to a current Subject Tab or create a new Subject Tab. Select “Add” once a Subject Tab has been selected, and the test will be attached to that tab.
- To add a test on your Teacher Dashboard, click the "+" button and then select "Self-Assess" at the top of the pop-up window. Select self-assess tests you want to use for testing. The “Add Selected” bar will appear at the bottom of the page. Select “Add Selected” and the test will be added to the active Subject Tab. Please Note: Before adding tests, make sure you are on the correct Subject Tab. Once you add the tests, they will appear on the home screen under the active Subject Tab.
- When searching for Self-Assess tests in the Test Explorer, you can use the filters to narrow your search by grade level, content area, and test type (if desired). Self-Assess test is identified with the Self-Assess icon (
 ) and will say “Special Info”.
 - Select the test name to preview the test. Select either "Teacher one-on-one" where the teacher reads the question and records the student's answer, or "Student self-assess" to listen to the question-and-answer audio.
Practice Test
If a student has never taken a Self-Assess test, a Practice Test will automatically be available in the first test slot. The Practice Test consists of six questions designed to familiarize students with the buttons and question types they will encounter in Self-Assess tests, such as multiple-choice questions. Students can take the Practice Test as many times as needed; it does not record any scores and is not included in any reporting.
You can add a Practice Test to any set of tests for a student by clicking the "Add Practice Test" button. If you need to remove the Practice Test, simply click the X on the test card window.
You may select up to three tests: one Practice Test and two Self-Assessments, or three Self-Assessments.
- Click the blank Add Test card to find and add another Self-Assess test.
- Click Start Session and hand the device to the student.
- Clicking on the green arrow will start the test session. Once each test is completed, the student will return to the landing page.
- The tests can be started in one or two ways:
- By selecting the student's name and selecting the Test button, or
- Select the Student Self-Assess icon (
 ) on the test card to launch the test.
Practice Test on Main Screen
Before the students begin testing, the student will see a directions screen that explains the options available on the test question screens.
-
 Audio Button – Click on this button to listen to the question.
 -
 Back Button – Select this button if you wish to go back a question.
  Forward Button – Select this button when ready to proceed to the next question.
Homepage Lock Settings
After completing all tests, the Success page will be displayed. The student should hand the device back to the teacher, who will then close the screen and return to the Home Screen. Please refer to the Homepage Lock Setting below, which allows for a 4-digit PIN requirement before exiting the Home Screen.
- Go to your Account Settings, select Student Testing Options, and click the box to change the setting to “Enabled”, under the Lock Homepage section.
- Enter a four-digit PIN and confirm, then SAVE.
- The PIN is required to exit and go back to the Home Screen.