To learn how to view, edit, add questions and summary notes in the Classic Version of ESGI, click here.
Overview
Test Sessions are easy to access and modify, enabling you to effortlessly edit your students' responses and make any necessary adjustments in a smooth and efficient way. This article gives step by step instructions on how to locate the test session details, how to edit the test sessions, how to edit the test responses, and how to add or edit the summary or test questions notes.
Note: Only the Teacher who originally administered the specific Test Session can make edits to that Test Session.
How to View Test Session Details from the Homepage
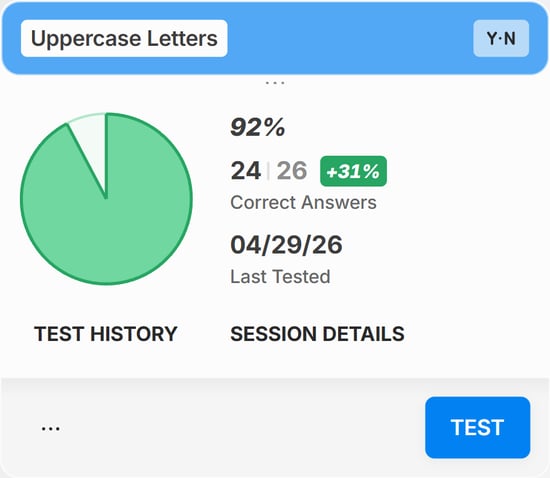
1. From the Homepage, select the class, group, or student for which you’d like to see test session details.
2. Click the SESSION DETAILS button located on the bottom of the test card (see Image 1).
Note: If you're viewing the X-Small Test Card type while you have a student selected, or if you're viewing the X-Small or Small Test Card Type while you have a class or group selected, you will have to select the three dots ![]() icon at the bottom left of the Test Card (see Image 1) first, then select Last Session Details (if a student is selected) or Session Details (if a class or group is selected).
icon at the bottom left of the Test Card (see Image 1) first, then select Last Session Details (if a student is selected) or Session Details (if a class or group is selected).
Image 1
How to View Test Session Details from the Test Dashboard
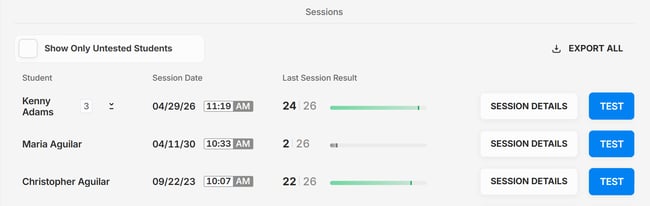
1. Click on any Test Card from the homepage to go to the Test Dashboard.
2. At the bottom of the Test Dashboard, under Sessions, locate the desired session from the list that appears. The tests will be listed by the date given.
3. Click on the Session Details button for any student and test to open the Test Session Details modal (see Image 2).
Image 2
How to Edit Test Session Details
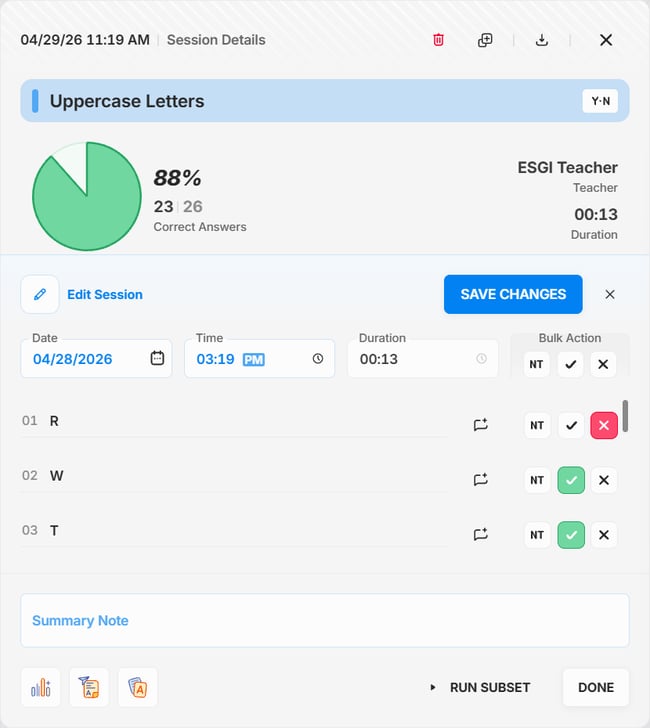
1. Once you select a Test Session, the Session Details window will appear. To edit the test, select the ![]() button located to the right of DETAILED RESULTS.
button located to the right of DETAILED RESULTS.
2. There are 3 question response options you can choose to edit, located on the right side (see Image 3):
-
 – Correct
 – Incorrect
 – Not Tested
3. Modify answers by selecting the √, X, or NT icons either for individual questions or for an entire row using the Bulk Action options (see Image 3). This allows you to quickly mark responses as correct, incorrect, or not tested.
Note: Answers under the "Not Tested" column are counted in the score as "Incorrect". Answers under the "Not Tested" column can be left out of the Parent Letter. To include the "Not Tested" answers on the Parent Letter, select the “Skipped Questions” option when running the Parent Letter.
4. You also have the abilities to edit the Session Date and Time by clicking on their respective fields.
5. When you are finished making edits, click the blue SAVE CHANGES button (see Image 3)
Note: Saved changes cannot be "undone" because the system does not know what was edited, but answers can be selected again and moved back to their original column.
Image 3
How to Edit Test Session Notes
An orange note ![]() icon will appear to the left of any question which have notes. To edit the note, follow the steps below:
icon will appear to the left of any question which have notes. To edit the note, follow the steps below:
1. Click the note icon to view the full note.
2. Make the edits in the blue Comment text box, then click SAVE.
Note: Any note can be added to an answer even after testing is completed.
How to Add Test Session Notes
1. To add a note, start by clicking the Black Note ![]() icon next to the question you wish to add a note to.
icon next to the question you wish to add a note to.
2. enter the note in the Comment text box, and then click SAVE.
Note: To delete a note, select the orange note icon, delete the note, and select Save.
How to Add a Test Summary Note
1. To add a Summary Note at the bottom of the test session, click on the the Summary Note text box, type in your desired notes (see Image 3).
2. Once you have finished typing your note, click DONE.