To learn about the Student Progress Report in the Classic Version of ESGI, click here.
Overview
The Student Progress Report is similar to a report card. It lists all the test scores, percentages, and/or grades (if Grade Scales are configured) for one student. The report can be run for all tests on a single Subject Tab, or for all tests on all Subject Tabs.
Step-by-Step Instructions
1. Click on the Reports button located on the left side of the screen, then click Student Progress.
2. Select the Class, Group, or Individual Student(s) then, using the drop-down menu, select the Subject Tab or select “All” to include all Subject Tabs (see Image 1).
3. Using the check boxes to the left of each test, check the tests to be included in the report (see Image 1). Use the scroll bar on the right side to view and select additional tests. You can also sort the tests names by ascending/ descending order by clicking on the Test Name button, and quickly select/deselect all tests by clicking on the double checkmark button
4. Select the following options to include on your report (see Image 2):
- Type - Display the number correct as either a percentage, score, or grade (if available).
- Settings - Toggle the Baseline and/or Carry Forward on/off.
- Scores from a first test session will appear as the baseline on all reports. If that first test session is deleted, then the next test session will become the baseline.
- If Carry Forward is checked, the score will reflect the student's last test session regardless which marking period they were tested in. For example, If the student is not tested during the 2nd marking period, the 1st marking period's score will remain.
- If Carry Forward is not checked, only the scores from specific marking periods are shown.
- Display Not Tested As - Choose to display untested items as either NT or Zero.
- Output - Choose to display the output either in Color or in Black and White.
5. Click Run Report.
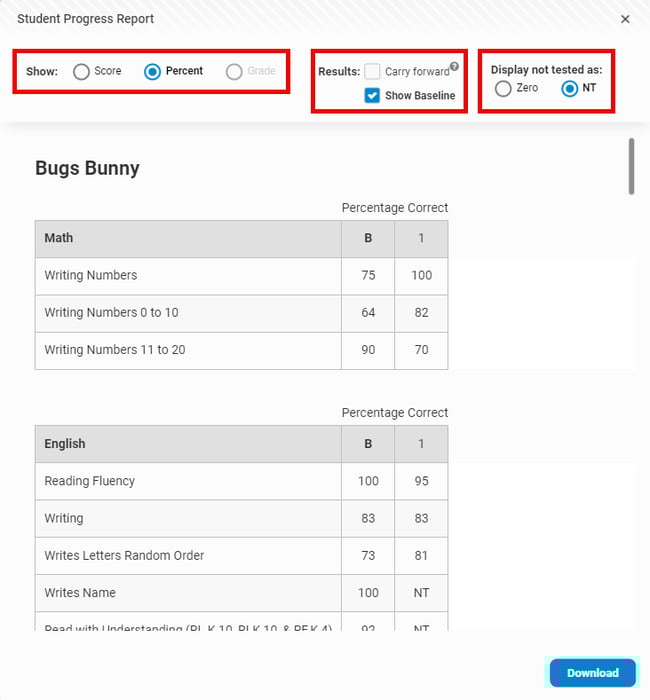
6. Display options are listed at the top of the report (see Image 3):
-
Show - Select to display Score, Percent or Grade (if available).
-
Results Section - Toggle the Baseline and/or Carry Forward on/off.
-
If "Carry Forward" is checked, the score will reflect the student's last test session regardless of which marking period they were tested in. For example, if the student is not tested during the 2nd marking period, the 1st marking period's score will remain. If "Carry Forward" is not checked, only the scores from specific marking periods are shown.
-
If “Show Baseline” is checked, the Baseline Score (B) will show on the report (this is selected by default). If this option is not checked, the Baseline Score (B) will not show on the report. This setting will persist each time the report is generated.
-
-
Display Not Tested - Choose to display untested items as either NT or Zero.
-
If the "Zero" radio button is selected, those same values become 0.
- If the "NT" radio button is selected, an "NT" will display if the student was not tested.
-
6. To download a PDF to your computer, click Download in the bottom right corner (see Image 3), then select One PDF File (a single file that contains all students) or select ZIP (a zipped folder that contains individual PDF files for each student). To download to your Google Drive instead, select Google PDF or Google ZIP File.
Please note: When downloading a large amount of data, a pop up will appear letting you know the file is generating and will continue to run in the background. Click Got It to continue using your account. If you are downloading a zip file, when the zip file is ready, a notification will appear in the lower left corner. Click on the notification to view and print the file.
7. Once the report is downloaded, the report name, date, and student name are at the top of each page. The marking period key is at the bottom of each page.
Image 1
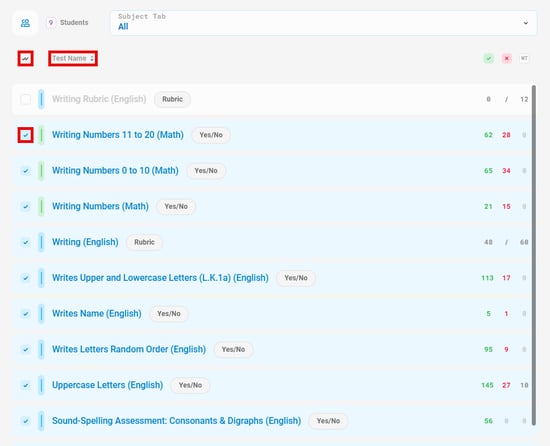
Image 2
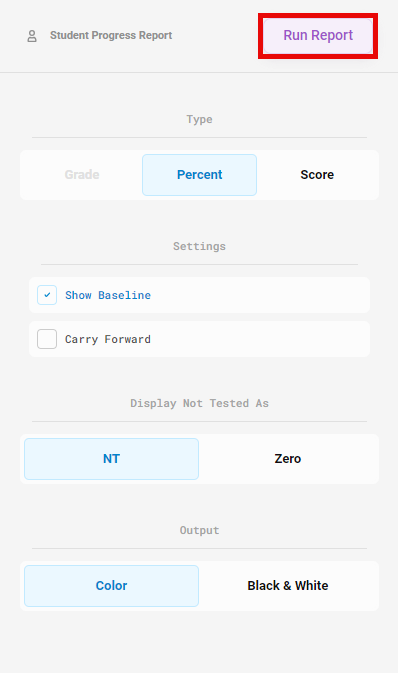
Image 3