Overview
The Student Manager is a tool that you can use to easily add students to a teacher's class or specialist's group or transfer them between classes. All students assessed in ESGI are accessible through Student Manager, whether they belong to a teacher's class, a specialist's group, or a Pre-Assessment screening.
Assigning Students Using the Student Manager
Follow these steps to assign students using the Student Manager:
1. Click the Student Manager icon located on the left side of the screen (see Image 1).
2. Using the Search by student or ID field, enter the name of the student you wish to assign. If the student is in Student Manager, the student's name will display as it is typed. You can also choose to filter students by their school, teacher, and/or grade, as well as by if they are a standard student, or if they belong to a specialist (see Image 1).
3, Click on the check box to the left of the desired student’s name.
4. Once at least one student is selected, you will now have options to Assign, Unassign, or Delete (see Image 1).
5. Click on Assign, then select whether to assign the student to a Primary Teacher and class or Specialist and group. You will also need to select the school location if you are using a district admin account (see Image 2).
6. Click the blue CONFIRM button located in the bottom right of the Assign To pop up (see Image 2).
7. The student is now in the teacher’s class or specialist’s group.
(Image 1)

(Image 2)

Manually Adding Students in the Student Manager
Follow these steps to manually add students using the Student Manager:
1. Click on the + symbol next to Students (see Image 1).
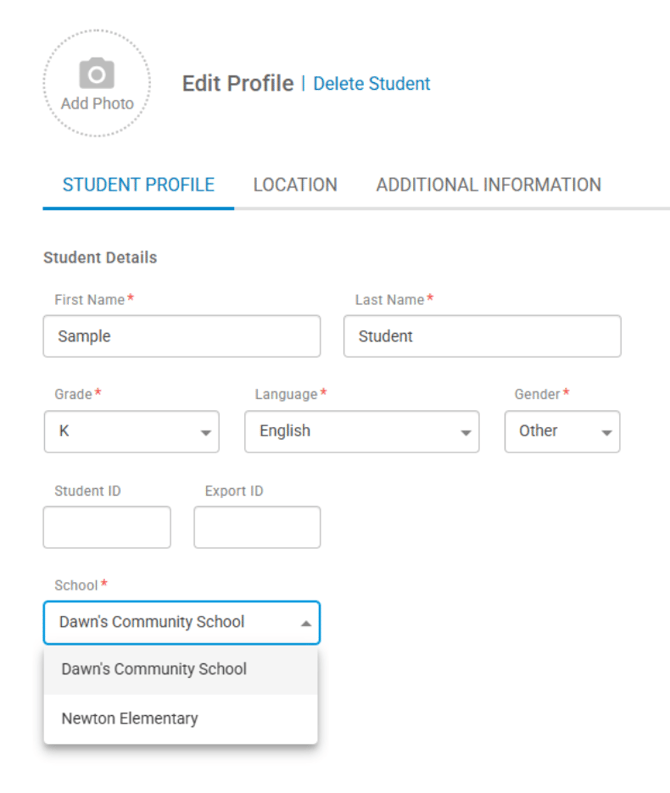
2. Enter the student’s details in the STUDENT PROFILE Tab (see Image 3)
Please Note: If you are in a District Admin Account, you will also need to select a school.
3. Click on LOCATION to the right of STUDENT PROFILE to place the student in a teacher’s class.
4.You can add a student’s date of birth, race and ethnicity, lunch status, special programs, and additional comments by clicking on the ADDITIONAL INFORMATION tab.
5. At the bottom right of the screen, click SAVE or SAVE AND ADD ANOTHER if you are entering more students.
Please Note: If your district imports student rosters, although you can manually edit and move students within a district admin account, your district imports teacher and student information nightly and any manual changes will be overridden when the nightly import runs. All information comes into Student Manager via the import.
(Image 3)
Viewing Previous Test Scores After a Student is Assigned
To view previous test scores, the exact same assessments must be added to the teacher's Home Screen. A student's final test score from the previous school year will become the Baseline score for the current school year.
Please Note: Manually adding a student that exists in Student Manager will create a duplicate and the previous test data will not be shown.