
Overview
Student Auto Grouping in ESGI helps teachers and specialists quickly create effective small groups using student assessment data. Groups can be generated based on student performance or created randomly to support more heterogeneous learning groups.
Users can select a class, choose the number of groups or students per group, and include one or more subject tabs in the grouping criteria. The tool uses each student's most recent completed test-session score from the selected tabs to automatically organize students into groups. After groups are created, users have the flexibility to adjust percentile ranges, move students between groups, or remove students as needed.
Designed to streamline instructional planning, Auto Grouping transforms assessment data into actionable student groups, saving educators valuable time while supporting targeted instruction. This feature is available to teachers and specialists in the redesigned ESGI experience.
Creating Auto Groups
To create auto groups in your ESGI teacher or specialist account, follow these steps:
- From your homepage, click on the Groups tab within the Students panel on the left.
- Click Generate Auto Groups at the top of the tab.
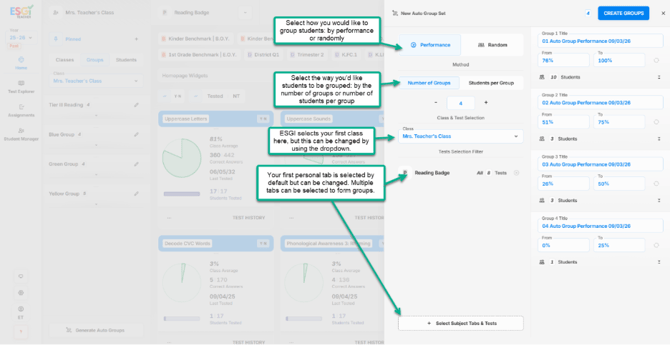
- Configure your auto groups quickly by selecting your settings within the New Auto Group Set panel (see Image 1). Using the left section of the panel, select the following (from top to bottom):
- Whether you would like students to be grouped by performance or randomly.
- Select Performance to group students by their last test session scores.
- Select Random to create heterogeneous groups.
- How students should be grouped – by number of groups or by the number of students per group
- Select Number of Groups if you’d like ESGI to evenly divide students between a discrete number of groups.
- Select Number of Students Per Group if you’d like ESGI to ensure groups have a specific number of students.
- Which class ESGI should use to create your groups
- Your first class is selected automatically if you have more than one class created.
- Simply click the dropdown to select a different class.
- Which Subject Tabs and/or tests you want ESGI to use to group your students
- Your first Personal Subject Tab (with all tests) is selected automatically.
- To select another Subject Tab (or multiple Subject Tabs), click the Select Subject Tabs and Tests button at the bottom of the panel (see Image 1).
- You may also group students specifically based on a single test or tests within a tab from this menu.
- Whether you would like students to be grouped by performance or randomly.
- View the Auto Groups generated by ESGI to ensure they meet your needs.
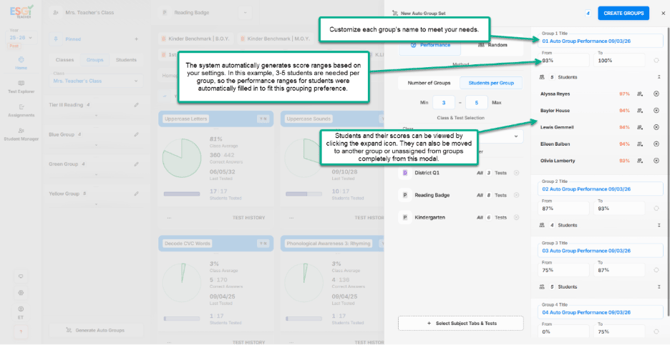
- You can rename your Auto Groups and make student changes before creating your groups.
- To learn more about editing Auto Groups, see the Editing Auto Groups section below.
- Click the Create Groups button.
- View your new Auto Groups in the Groups tab, and begin testing!
📌Note: Any changes made to your Auto Groups settings will likely affect the groups ESGI creates for you. As such, you’ll see a warning and button which will allow you to create the new groups based on your redefined parameters.
Image 1
Editing Auto Groups
Once you have configured your Auto Groups, you have the option to edit certain items before creating your groups. Please see the table below for your configuration options, depending on your settings. For a visual representation (see Image 2).
|
Grouped By |
Student Grouping |
Customization Options |
|
Performance |
Number of Groups |
|
|
Students per Group |
|
|
|
Random |
Number of Groups |
|
|
Students per Group |
|
Image 2
Deleting Auto Groups
Deleting Auto Groups works the same way as deleting any groups you create in ESGI. To delete any group, do the following:
- From the Groups tab within the Students panel, click the Edit icon (
 ) to the right of the group you want to delete.
 - Once in Edit mode, click the red trash icon (
 ).
). - Confirm you want to delete the group by clicking the Confirm button in the Delete Group modal which appears.
- Select the Groups tab from the Students panel.
- Select the group for which you would like to test and run reports.
Using Auto Groups
Auto Groups can be utilized the same as any other groups in ESGI. To begin testing a specific group, simply:
📌Note: To view students within any group, click the expand icon ( ) directly under each group’s name.