Overview:
The School Grade Report allows schools to set up customizable ‘report card’ style reports. These include a customizable Grade Scale (A, B, C, etc.) and customizable Grade Ranges (i.e., 90-100% correct = A). Grade scales for the blue School Subject Tabs (Managed Tabs) can be set up by a School Admin. The grade scales can be customized with point values for each test.
Step-by-Step Instructions:
1. From your Admin Dashboard, select Data from the left side of the application window. This will take you to the Data Page, which will always default on the Teachers level of the hierarchy if you're in a School Admin Account, or on the Schools level of the hierarchy if you're in a District Admin Account.
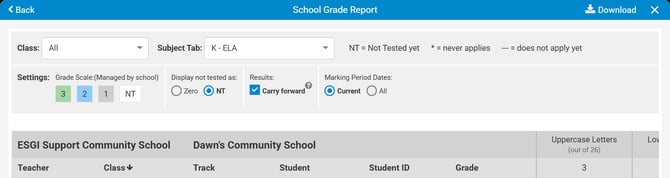
Note: The School Reports (or District Reports if in a District Admin Account) button in the bottom right corner of the application (see Image 1) will remain constant throughout all levels of the Data Page hierarchy by default.
2. Click on the blue School Reports button in the bottom right corner of the application screen (see Image 1) to see all the available school reports.
Note: If you are in a District Admin Account, you will first need to click the checkbox to the left of one of the schools from the data page list in order for the School Reports button to appear.
3. Select School Grades from the pop-up that appears.
4. From the School Grade Report window, click the blue EDIT button located at the top right to edit the grade scales (see Image 2).
5. Select Your Grade Scale - Under My Scales, choose an existing scale (if any have been set up) or Create My Own. You also have the option to select a pre-loaded System Scale (see Image 3).
Note: This grade scale will apply to all tests within the subject tab. While the grade percentage range can vary by test, the grade scale is constant for the entire subject tab.
6. To create a custom grading scale, enter information under Grade Description, to the right of CREATE MY OWN (see Image 3):
-
Fill in the Grades (high to low) that you want to use.
-
To change the pre-populated color, click on the color square and a menu selection will populate.
-
Fill in the description for each grade level.
-
Click on + Add another to add additional grade levels.
-
The order of the grades can be moved by selecting the 6 button menu under Order.
-
When done, select SAVE AND CONTINUE (see Image 3).
7. Select your Default Percentage values (see Image 4). A reminder will populate stating "The default percentage value will apply to all subject tabs using the [E-M-B] grade scale"
-
The grading scale will populate.
-
Enter the percentage range for each grade (see Image 4).
-
Select OK.
-
See step 8 to set a Custom Range.
8. Choose Set Custom Range to set a custom range for each test (see Image 5).
-
You can set a custom range for each test with a subject tab using a numeric range based on the total number of questions in each test.
-
Choose Subject Tab from the dropdown menu
-
The number of tests in that subject tab will appear in parentheses next to "Tests"
-
Select each test from the Tests dropdown menu
-
Select Same all year if your grading scale will stay the same across all marking periods.
-
Select Different per Marking Period if your grade scale will change for each marking period.
-
Complete the grade scale for each test in the subject tab (see Image 5)
-
Continue setting grading scales for more subject tabs by selecting another tab from the dropdown menu
-
When done, choose SAVE AND CONTINUE (see Image 5).
9. Click RUN REPORT (see Image 2)
10. Once the report runs, easily switch to run the report for another teacher, class, and/or Subject Tab (see Image 6).
The report can also be sorted by clicking on Teacher, Class, Student, Grade, and by the highest-to-lowest or lowest-to-highest score within each marking period column for a specific test. The arrow next to the column heading identifies the sorted column. If your school has varying marking period tracks, the legend will display:
-
*= Never Applies: the teacher or school does not have this marking period as part of their track
-
-- = Does not apply yet: the teacher/schools' marking period has not begun
Image 1

Image 2
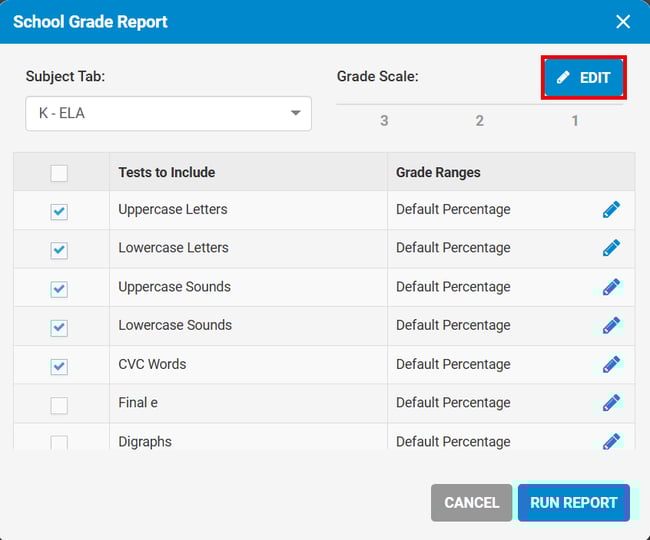
Image 3
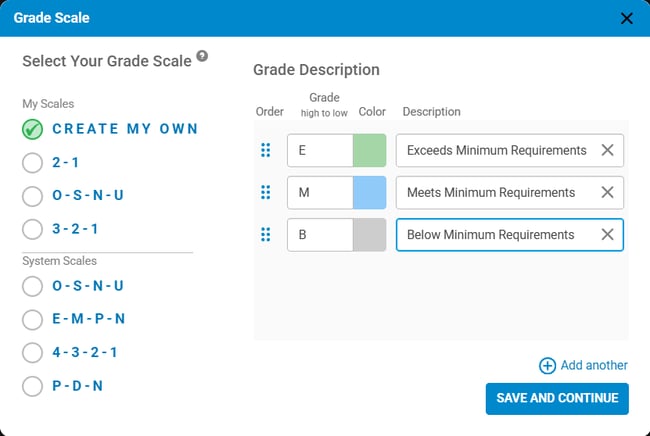
Image 4
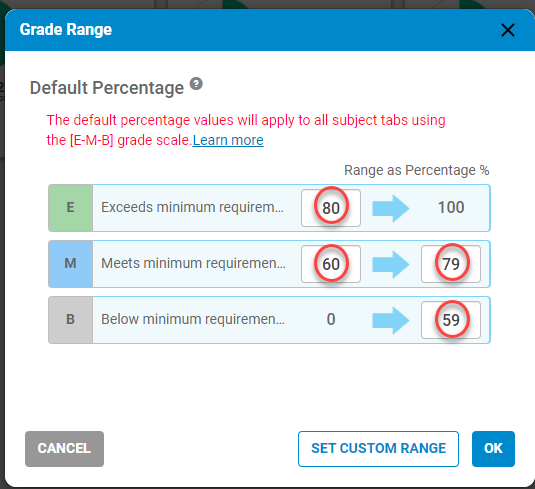
Image 5
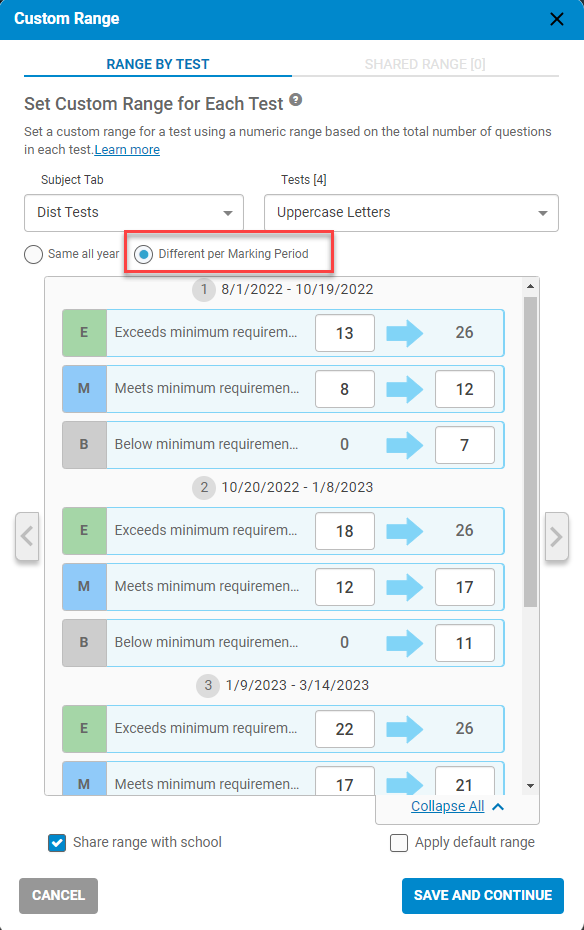
Image 6