
Overview
Mastery Levels in ESGI help teachers, specialists, and administrators quickly translate raw test scores into meaningful performance bands, such as Beginning, Developing, Proficient, and Advanced. Users can create their own Mastery Levels Sets with custom names, colors, icons, and score ranges, then assign each set to the specific tests or subject tabs where it should apply.
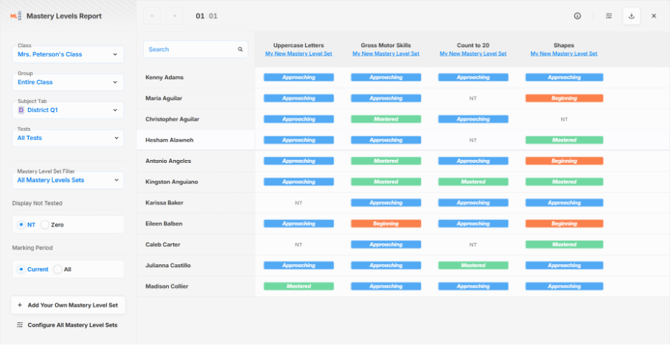
Once a Mastery Levels Set is assigned, the Mastery Levels Report shows a color-coded view of every student's mastery level across each test, making it easy to see performance trends across a class, group, or subject tab immediately instead of reading raw percentage scores test-by-test.
Designed to turn assessment data into an at-a-glance performance picture, Mastery Levels saves educators time when reviewing class performance and helps establish common language for performance across a school or district. This feature is available to administrators, teachers, and specialists. Teachers and specialists can access it in the redesigned ESGI experience only.
Accessing the Mastery Levels Report
To open the Mastery Levels Report, follow the steps below for your account type:
- Teachers and specialists: From your class homepage, find the Reports panel on the right side of the screen and select Mastery Levels.
- Administrators: From the Data page, select Mastery Levels.
Understanding the Default Mastery Levels Set
Every ESGI account starts with a Default Mastery Levels Set made up of four levels, which is applied to all tabs and tests automatically. You are not limited to these levels or their score ranges. You can build a set entirely from scratch (see Creating a Mastery Levels Set below).
|
Level |
Color |
Default Score Range |
|
Beginning |
Red |
0–59% |
|
Developing |
Yellow |
60–79% |
|
Proficient |
Green |
80–89% |
|
Advanced |
Blue |
90–100% |
Creating a Mastery Levels Set
To build a new Mastery Levels Set in your ESGI account, follow these steps:
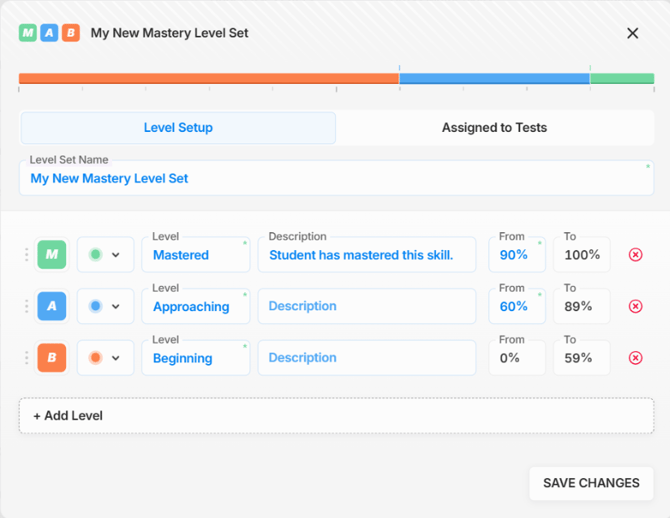
- From the Mastery Levels Report, select either Add Your Own Mastery Levels Set or Configure All Mastery Levels Sets, then choose to add a new set.
- On the Level Setup tab, enter a name for your set in the Level Set Name field.
- For each level in your set, configure the following (see Image 1):
-
- Color: Choose a color swatch to represent the level.
- Level: Enter a name for the level, such as “Mastered.”
- Description: Optionally, add a description of the level.
- From / To: Set the percentage range this level should cover.
-
- Select + Add Level to add another level, or select the remove icon next to a level to delete it.
- Select Save Changes to finish.
Image 1: Defining levels, colors, and score ranges
📌 Note: A new Mastery Levels Set isn’t applied anywhere until it’s assigned to one or more tests. See Assigning a Mastery Levels Set to Tests below.
Assigning a Mastery Levels Set to Tests
Once a set's levels are configured, assign it to the tests it should apply to:
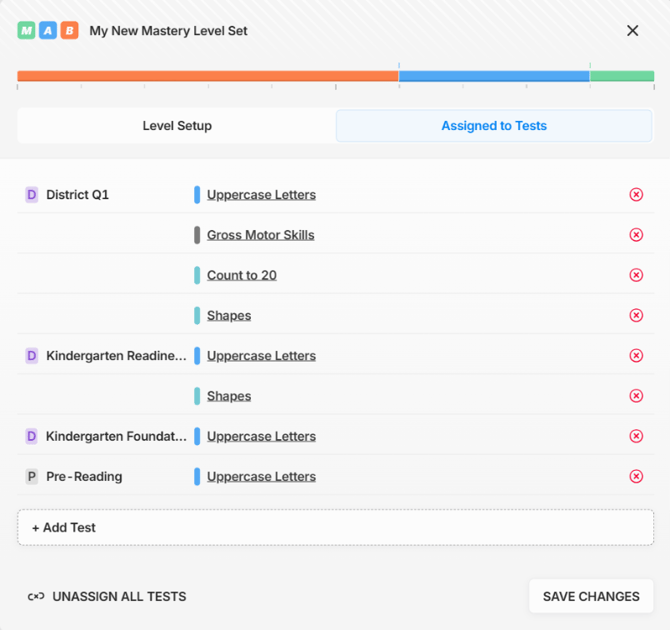
- From the Mastery Levels Set window, switch to the Assigned to Tests tab.
- Select + Add Test to choose which test or tests this set should apply to.
- To remove every assignment at once, select Unassign All Tests.
- Select Save Changes to finalize the assignment.
Image 2: Assigning a set to one or more tests
📌 Note: Only tests and subject tabs with a Mastery Levels Set assigned will appear as columns in the Mastery Levels Report. If an expected test isn’t showing up, check that a set has been assigned to it.
Editing a Mastery Levels Set
Mastery Levels Sets can be adjusted at any time. From the Mastery Levels Report, select Configure All Mastery Levels Sets, choose the set you’d like to change, and update the level details or test assignments as needed. Select Save Changes when finished.
Filtering the Mastery Levels Report
Use the filters in the left-hand panel of the report to control what's displayed:
|
Filter |
What It Does |
|
Class |
Switches between classes |
|
Group |
Shows the entire class or a specific group |
|
Subject Tab |
Shows results for a specific subject tab |
|
Tests |
Shows all tests, or one or more specific tests |
|
Mastery Levels Set Filter |
Shows all sets, or results for one specific set |
|
Display Not Tested |
Shows untested results as “NT” or as a score of “Zero” |
|
Marking Period |
Shows the current marking period, or all marking periods |
Each cell in the report shows a colored, labeled fill with the student’s mastery level for that test or NT if the student hasn’t been tested yet. Select any result to choose View Student’s Progress for more detail.
Image 3: The Mastery Levels Report
Exporting the Mastery Levels Report
Select the download icon in the report to choose from six export options, available as a local file or sent directly to Google Drive:
|
Export |
Delivery |
Detail Level |
|
|
Local file |
Single mastery level per student, per test |
|
Detailed PDF |
Local file |
All mastery levels per student, per test, over time |
|
Excel |
Local file |
Overview plus session-level detail for all mastery levels |
|
Google PDF |
Google Drive |
Single mastery level per student, per test |
|
Google Detailed PDF |
Google Drive |
All mastery levels per student, per test, over time |
|
Google Sheets |
Google Drive |
Overview plus session-level detail for all mastery levels |