To learn more about the Class Grade Report and setting up Grading Scales in the Classic Version of ESGI, click here.
Overview:
The Class Grade Report allows teachers to set up customizable ‘report card’ style reports. These include a customizable Grade Level (A, B, C, etc.) and a customizable Grade Range (i.e. 90 – 100 % = A). The grading scales can be customized with point values for each test.
Teachers can set a grading scale for tests on the gray Subject Tabs only. If there are blue (school) and/or purple (district) managed subject tabs, the grading scales are managed by the school or district. A teacher can create a grading scale that can be shared with other teachers in the school. In order for it to be visible to other teachers in the school, all teacher accounts must be linked to the school or district.
To Select Your Grade Scale:
1. Click on the ![]() icon underneath the Grades section on the right side of the report screen.
icon underneath the Grades section on the right side of the report screen.
2. Navigate to My Grade Scales.
3. Choose an existing scale (if any have been set up) or + Create Custom Scale (instructions on how can be found in the next section below). You also have the option to select a pre-loaded System Scale.
Please Note: Each grade scale applies to all reports within the associated Subject Tab. While the grade percentage range can vary by test, the grade scale is constant for the entire Subject Tab.
How to Create and Apply Grading Scales:
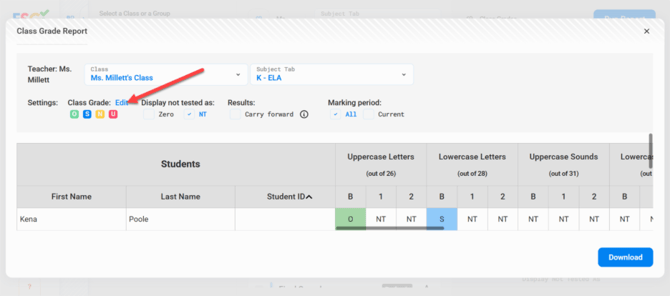
1. Grade scales are created and applied directly from the Class Grades Report. After running the report, click the Edit option located next to the Class Grade (see image 1).
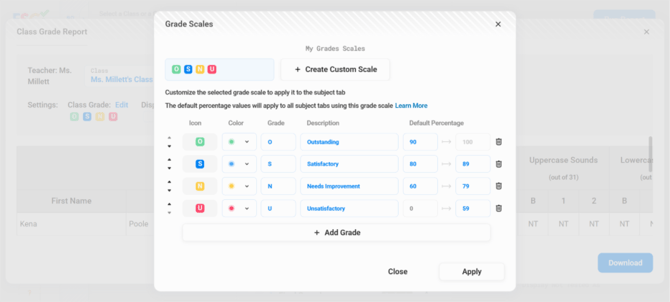
2. Within the editing screen, you can create new grade scales or modify existing ones. To create a custom grading scale, enter information in the fields below + Create Custom Scale.
3. Fill in the Grades (high to low) that you want to use.
4. To change the pre-populated color, click on the color square and a menu selection will populate.
5. Fill in the description for each grade level.
6. Select your Default Percentage values.
Please Note: The default percentage values will apply to all subject tabs using this grade scale.
7. Click on + Add Grade to add additional grade options.
8. The order of the grades can be moved by using the up and down arrows to the left of each grade option.
9. When done, click Apply and thee grading scale will populate.
(Image 1)
(Image 2)
How to Set Custom Ranges for Each Test:
1. Navigate to the Class Grade Report configuration screen.
2. Locate the test that you wish to apply a custom range to and click the ![]() icon located to the right of the test name (see Image 3).
icon located to the right of the test name (see Image 3).
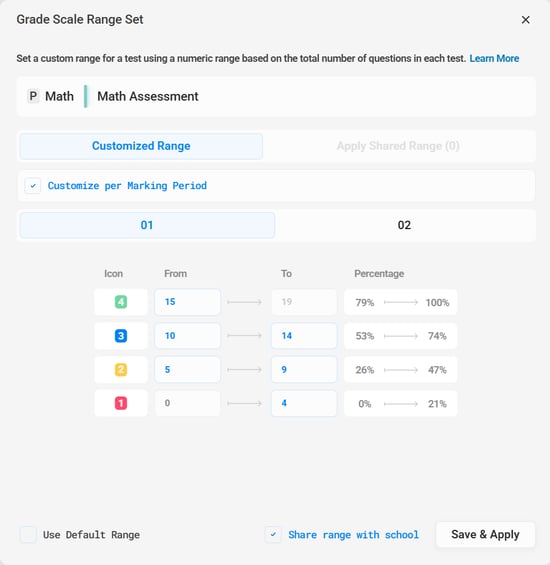
3. From the Grade Scale Range Set window (see Image 4), you have the options to:
-
Toggle between a personal custom range vs selecting a shared range
-
Customize grade ranges based on the marking period vs keeping the same custom ranges all year.
-
Set custom ranges for each grade level
-
Reset to the default range
-
Share the custom range with your school
4. Enter your desired custom ranges for each grade level using a numeric range based on the total number of questions in the selected test.
5. When you are finished setting up your custom ranges, click Save & Apply.
Please Note: If you selected the option to customize per marking period, you will not be able to save and apply your custom ranges until you have set up custom ranges for each grade level in each of the marking periods.
6. You will know that a custom grade range has been applied to your test by the blue Custom indicator that will appear in place of the gray Default indicator (see Image 3).
(Image 3)

(Image 4)
Running the Report:
1. Once you have selected all of your desired configurations, click on the blue Run Report button located at the top right of the screen.
2. The Grade Report has built-in flexibility to customize settings and view data in several different ways, along with the abilities to:
-
Easily switch to another Class or Subject Tab by clicking the drop-downs
-
View Range Settings – will display above each test column. Click to view the range setting for each test. You will also have the ability to create Custom Ranges for each test (see section above).
-
Select, create, or edit the Class Grading Scale (see section above)
-
Display not tested items as either NT or as Zero:
-
-
If the "NT" radio button is selected, an "NT" will display if the student was not tested.
-
-
-
If the "Zero" radio button is selected, those same values become 0.
-
-
Toggle whether results will:
-
-
Carry forward - if checked, the score will reflect the student's last test session regardless of which marking period they were tested in. For example, if the student is not tested during the 2nd marking period, the 1st marking period's score will remain.
-
If "Carry forward" is not checked, only the scores from specific marking periods are shown.
-
-
Select Marking Period:
-
-
If All is selected, scores from all marking periods will be shown.
-
If Current is selected, only scores from the current marking period will be shown.
-
3. The report can be sorted by First Name, Last Name, and by the highest-to-lowest or lowest-to-highest score within each marking period column for a specific test:
4. Click Download, then select either PDF or Excel.