To learn how to change the test session date in the Classic Version of ESGI, click here.
Overview
You can update the date of a test session directly from the Details section of your Teacher account. Adjusting the session date makes it easy to move a test to a different marking period or track while keeping your assessment records accurate and organized.
How to get to the Test Session Calendar from the Homepage
1. From the Homepage, select the class, group, or student for which you’d like to see test session details.
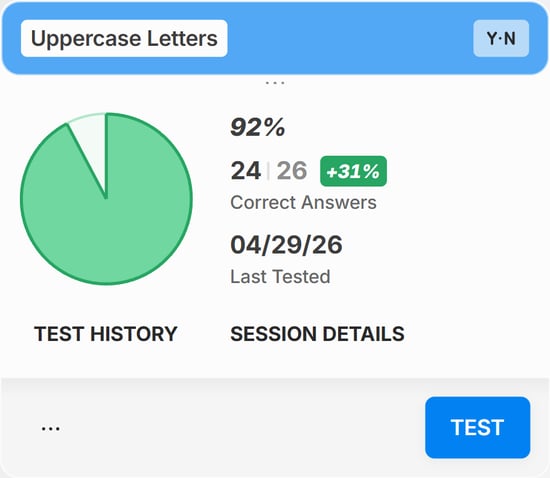
2. Click the SESSION DETAILS button located on the bottom of the test card (see Image 1).
Note: If you're viewing the X-Small Test Card type while you have a student selected, or if you're viewing the X-Small or Small Test Card Type while you have a class or group selected, you will have to select the three dots ![]() icon at the bottom left of the Test Card (see Image 1) first, then select Last Session Details (if a student is selected) or Session Details (if a class or group is selected).
icon at the bottom left of the Test Card (see Image 1) first, then select Last Session Details (if a student is selected) or Session Details (if a class or group is selected).
Image 1
How to get to the Test Session Calendar from the Test Dashboard
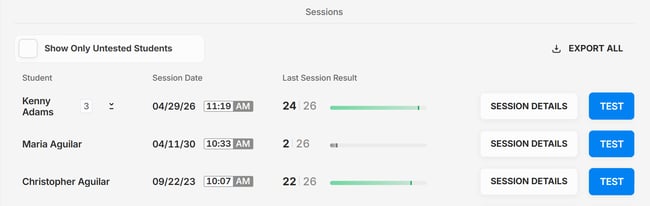
1. Click on any Test Card from the homepage to go to the Test Dashboard.
2. At the bottom of the Test Dashboard, under Sessions, locate the desired session from the list that appears. The tests will be listed by the date given.
3. Click on the Session Details button for any student and test to open the Test Session Details modal (see Image 2).
Image 2
How to change the Test Session Date
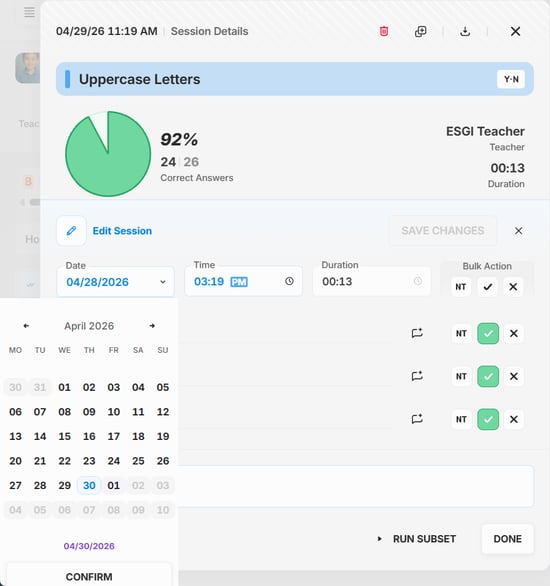
1. Once you're in the Session Details modal, click on the ![]() button located to the right of DETAILED RESULTS.
button located to the right of DETAILED RESULTS.
2. Click the Calendar ![]() button in the Date field (see Image 3).
button in the Date field (see Image 3).
Note: Alternatively, you can manually type in the desired test date into the Date field.
3. Select a new test date and click CONFIRM (see Image 3).
4. Click the blue SAVE CHANGES button to save your changes.
5. The new Date will now be displayed for this Test Session.
Image 3
How to change the Test Session Date
1. Once you're in the Session Details modal, click on the ![]() button located to the right of DETAILED RESULTS.
button located to the right of DETAILED RESULTS.
2. Click on the Time field (see Image 3)
3. Type in your desired test time. You are also given the option to choose between AM and PM.
Note: Please use HH:mm format when typing your desired time (i.e. 07:30 instead of 7:30).7
4. Click the blue SAVE CHANGES button to save your changes.
5. The new time will now be displayed for this Test Session.